Consulting and web app · Agriculture

MantarCi: Mushroom Production Protocol and Tracking Panel

The work began as a production guide and grew into a web application. Oyster mushrooms (Pleurotus ostreatus) were to be grown in a mushroom room of about 30 m² on an organic integrated farming project in Giresun, with no boiler or steam room and the grower doing the work himself. We first reviewed official and academic sources and wrote a three-document protocol that fits these conditions and can be followed step by step: everything is written down, from how much straw to buy to what happens to a contaminated bag. We then built MantarCi to carry the protocol into daily work: a panel the grower opens in the browser that tracks production by building, room, shelf and individual bag, works out the protocol steps from the inoculation date to show what needs doing today, and keeps harvest, sales, expenses and stock in one place.
  • Review of official and academic sources
  • Source comparison tables
  • Recipe, scale and capacity calculations
  • Materials and equipment lists
  • Growing room set-up plan
  • 28-step application protocol
  • Day-by-day schedule
  • Quality control and record keeping
  • Markdown document set
  • Web application (HTML, CSS, JavaScript)
  • Supabase: database, sign-in, row-level security
  • IP cameras and an on-site computer (Python, ffmpeg)
Application protocol: single batch recipe
Crop
Oyster mushroom (Pleurotus ostreatus)
Method
Hot water pasteurisation in a drum
Scale
15 kg of spawn, 7 drum batches, about 37 bags
Estimated harvest
75-95 kg over 3 flushes (estimate in the documents)
Documents
3 documents, 28 steps from preparation to sale
Application
MantarCi: sign-up, set-up wizard, tracking panel

The protocol images come from the documents in the repository, converted into a plain document layout; tables and figures match the documents. The panel screenshots were taken from a local copy of MantarCi with a fictional business and sample data; names, phone numbers and figures are not real. Figures from the official PDFs should be checked at the source before use.

01

A method chosen from the sources, and a lime option

The first document answers the question of how to disinfect the straw (pasteurisation: reducing harmful microbes by holding it at a set temperature, without boiling). Publications by Turkish provincial directorates and universities, foreign university and government publications and peer-reviewed papers were reviewed, and their temperatures and times were placed side by side in one table. A method that needs no heated drum and no fuel was also added to the document. Because it does not appear in Turkish official documents, it is described as something to try after the hot water method is established, not in the first batch.

  • An eight-row comparison table: method, temperature and time according to Çukurova University, the Bartın Provincial Directorate of Agriculture and Forestry, Sakarya University, the University of Florida (UF/IFAS) and NIOS in India
  • Decision: a hot water bath in a drum for an operation without a boiler or steam room. Once the centre of the sack reaches 65-70 °C it is held for 45-60 minutes; never above 72 °C, never below 60 °C
  • Why boiling (100 °C) is unnecessary was explained with a peer-reviewed study: excessive heat treatment lowers the yield
  • A mistake in the project plan was corrected: chicken manure is for button mushroom compost and does not go into the oyster mushroom substrate (the mix the mushroom grows on). The findings in the literature and the green mould risk were explained, and the manure was redirected to the worm farm and the hazelnut orchard
  • The source list has three levels: official and university publications from Türkiye (Bartın, the Çukurova document published in Kayseri, Samsun, Denizli, the Ministry leaflet, Sakarya, Uludağ, the MEB MEGEP modules, Mantar Dergisi), foreign government and university publications (Cornell, UF/IFAS, NIOS, IIHR, SARE) and peer-reviewed papers
  • Tips from blogs and sellers were given under a separate heading with a "check the figures" note
  • Transparency note: the start of the document states clearly that the official PDFs could not be downloaded in the working environment, so the figures were compiled from search excerpts and must be checked against the Bartın and Çukurova documents before use
  • In a SARE-funded farm trial in the US, the lime method gave a higher biological efficiency than hot water (41% against 29%); this was reported with its source
  • Types of lime: only slaked (hydrated) lime; quicklime is caustic and dangerous, agricultural lime does not dissolve and does not work, dolomitic lime is not used, magnesium should be below 10%
  • The dose is measured by pH: the solution should be pH 12-13; start with 500 g per 100 litres of water and add more after checking with pH paper
  • The straw stays fully submerged for 12-24 hours, is drained, is not rinsed (the high pH protects it) and is inoculated straight away
  • Lime water is not poured on the garden; it is diluted and its pH lowered before it goes on the soil. Gloves, goggles and a mask are required
Pasteurisation temperatures and times according to the sources
Steps for cold pasteurisation with slaked lime and the assessment of the spawn blocks
02

Recipe, scale, materials and equipment

There were 15 kg of HK-35 spawn on hand (mushroom mycelium grown on grain, used in place of seed). The recipe is based on official sources and the quantities were worked backwards from this stock: how many kilos of straw, how many drum batches and how many bags were each calculated. The second document is written like a list to take shopping. Each item has its quantity, where to find it and what to watch out for; wherever possible, materials that the farm could already have were suggested.

  • A recipe table with sources: wheat straw 90-95%, bran 5% (at most 10%), lime and gypsum 1-3% in total, 2-5 kg of spawn per 100 kg of wet substrate, moisture 70-75%; each row names the institution it comes from
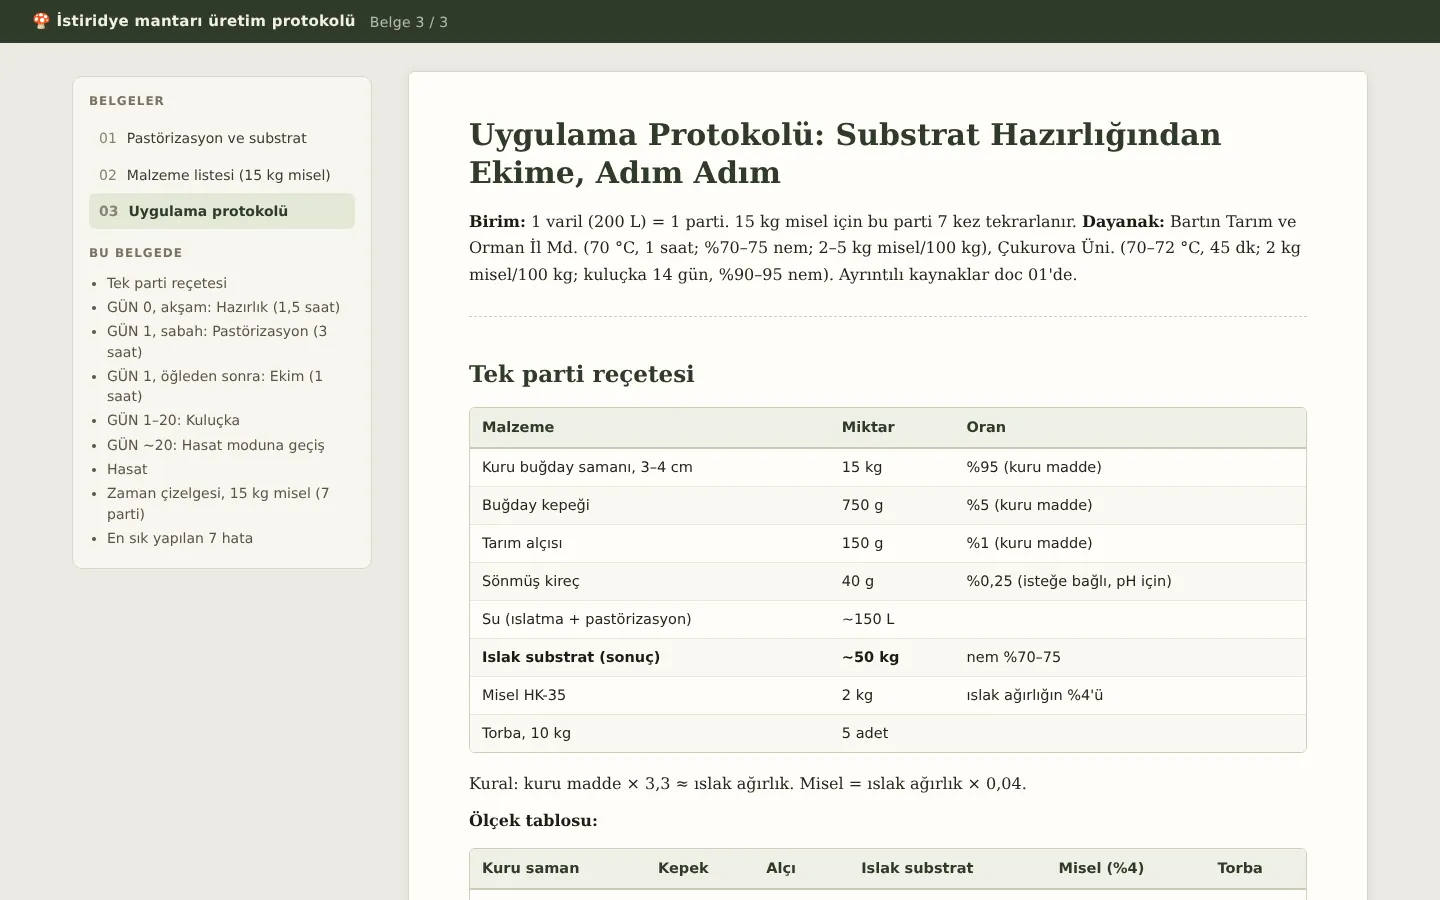
  • Single batch (1 drum) recipe: 15 kg of straw, 750 g of bran, 150 g of gypsum, 40 g of slaked lime and about 150 litres of water give about 50 kg of wet substrate; 2 kg of spawn, 5 bags
  • A scale table (15, 30 and 100 kg of dry straw) and two easy rules: dry matter × 3.3 gives the wet weight, wet weight × 0.04 gives the amount of spawn
  • Capacity for 15 kg of spawn: about 375 kg of wet substrate, 100 kg of dry straw, 5 kg of bran, 37 bags and 7 drum batches
  • Why a 4% spawn rate was chosen is explained: the spawn had been kept warm, so the safe end of the official range helps it get ahead of competing moulds
  • The harvest estimate in the documents: 20-25% of the wet substrate, about 75-95 kg of mushrooms over three flushes
  • Raw materials: 120 kg of straw (7-8 bales), 6 kg of bran, 2 kg of agricultural gypsum, 1 kg of slaked lime; chopped straw from a feed dealer if possible, "agricultural gypsum, not gypsum stone powder", no quicklime
  • Pasteurisation: a 200-litre steel drum with a lid (not galvanised, a clean food or water drum; with two drums the 7 batches take 3-4 days), a wood stove or gas burner, two digital probe thermometers (one as a spare), mesh sacks, a weight, a draining rack, a mixing tarpaulin, heat-resistant gloves
  • Four ways to chop the straw, from easiest to hardest: chopped straw from a feed dealer, a borrowed silage chopper, a lawnmower run inside a crate, and as a last resort a machete to 3-4 cm
  • Bagging and inoculation: 45×70 cm polyethylene bags of 50-60 microns (clear bags show colonisation and mould), ties, a hole-punching tool, a 50-100 kg scale, a 5 kg kitchen scale, buckets
  • Hygiene and health: a new N95/FFP2 mask every day, nitrile gloves, 70% alcohol, bleach diluted 1 to 10, safety goggles
  • Harvest and sale: a sharp knife, ventilated crates, paper bags or perforated film, cold storage
Capacity calculation for 15 kg of spawn
Single batch recipe and scale table, phone view
03

Growing room set-up

For Mushroom Store A of about 30 m², the incubation zone (while the spawn colonises the bag) and the fruiting zone (while the mushrooms grow) were planned separately. The two stages need different temperatures, humidity and light, so the room was divided in two.

  • 5-tier metal shelving: 2 units are enough for 37 bags, 3-4 with room to grow; bags do not touch, and can be hung from the ceiling on a rope if preferred
  • Two thermo-hygrometers (temperature and humidity meters) that record minimum and maximum values: one for the incubation zone, one for the fruiting zone
  • Because a basement in Giresun is 14-16 °C in October, a heater with a thermostat for incubation; a temporary solution until the heat from the poultry house is connected
  • An ultrasonic humidifier or misting 3-4 times a day for humidity in the fruiting stage
  • A duct fan extracting outdoors for 4-6 air changes an hour; with the note that if carbon dioxide builds up the stems get long and the caps small
  • White LED lighting on a timer, a washable floor and a plastic curtain separating the warm, dark incubation area from the cool, bright fruiting area
Incubation and fruiting room materials with the harvest and sale list
04

28 steps from inoculation to sale

The third document is the protocol to keep in hand on site: written with 1 drum = 1 batch, every step states what to do, what to measure and how long it takes.

  • Day 0, evening (1.5 hours): clean the room, choose the straw by smell and sight, chop it, pre-soak for 12-24 hours
  • Day 1, morning (3 hours): add the supplements, heat the water to 75 °C, submerge, hold for 60 minutes, lift out and drain, cool to 25 °C, moisture test; the temperature is logged every 10 minutes
  • Day 1, afternoon (1 hour): put on a mask and gloves, break up the spawn, weigh the substrate, mix for 3-4 minutes, fill each bag with 10 kg, punch 12-15 holes, label
  • Critical order of work: bran and gypsum go in before pasteurisation (dry bran added afterwards is the number one cause of mould), no spawn until the substrate has cooled to 25 °C, and if the temperature drops the time spent too low does not count
  • Inoculation method: thorough mixing or layered "sandwich" inoculation; 8-12 kg per bag, 1 cm holes in the sides and 2-3 at the bottom so water does not collect
  • Spent substrate is not thrown away: after three flushes it goes to the worm farm or is used as poultry litter
Steps on pasteurisation day
05

Incubation, switching to fruiting and harvest

The period after inoculation is also described day by day: when and how to check the bags, how to change the room so the mushrooms fruit, and how to harvest.

  • Incubation conditions table: 22-25 °C (no more than 28 °C inside the bag), 85-95% humidity, darkness, 14-20 days; with sources
  • Colour guide for incubation: white cottony mycelium is normal; a green patch means Trichoderma, black Aspergillus, orange or pink Neurospora, sticky wetness and a sour smell bacteria. It also notes that yellow-brown droplets are normal
  • A contaminated bag is not opened in the room, it is destroyed outside and not given to the worm farm either; which bag, which day and which colour go in the logbook
  • Switching to fruiting ("shocking"): the temperature is lowered to 15-18 °C, humidity raised, 6-8 hours of light a day, 4-6 air changes an hour; the signal for the mushroom to fruit
  • Pinhead stage (primordia) 3-7 days, growth 4-7 days; first harvest 25-30 days after inoculation
  • Harvest: picked while the cap edge is still curled under, by twisting off at the base or cutting; at most 2 layers in a ventilated crate; 7-10 days between flushes, the bag is emptied after three flushes
  • Sale: delivered the same day; unsold mushrooms kept at 2-4 °C in a paper bag for at most 4-5 days
Daily checks during incubation and the steps for switching to fruiting
06

Schedule, quality control and records

To avoid risking all 15 kg of spawn at once, the work was split into a 60-day schedule. A small trial batch comes first; if it stays clean, the remaining batches are inoculated two at a time. The documents explain not only what to do but also how to tell whether things are going right. The values to measure, the common mistakes and the records to keep are written out separately.

  • Day-by-day schedule (days 0-60): trial batch, decision on day 7, batches in pairs, switches to fruiting, main harvest and the 2nd and 3rd flushes
  • Trial batch: 2 kg of spawn, 5 bags; if the trial is contaminated the remaining spawn is not used and new spawn is ordered
  • While the trial colonises, finishing the shelves, heater, fan and bags and talking to buyers were put in order
  • First production checklist (with tick boxes): commitments from 3-5 buyers (greengrocers, restaurants, hotels), equipment, straw, supplements, spawn, whether the incubation and fruiting areas can be separated, masks and hygiene, a logbook
  • Start small: the first batch is 5-10 bags, scale up once the method is established
  • Checkpoints: thermometer probe right in the centre of the sack, moisture by the squeeze test (a few drops between the fingers, not a stream), weighing the spawn rate, the number of holes per bag
  • Assessment of HK-35 spawn blocks that were kept warm: smell test, colour check, 7 days of watching 1-2 trial bags
  • When buying new spawn: produced less than a month ago, kept at 2-4 °C, and no more than 2 days in transit
  • The 7 most common mistakes: inoculating hot substrate, substrate that is too wet, adding bran afterwards, guessing the spawn amount, stacking bags, forgetting ventilation, opening a contaminated bag in the room
  • Logbook fields: batch number, date, straw source, drum temperature and time, kilos of substrate and spawn, number of bags, contamination (which bag, which day, which colour), harvest date and kilos; a label on every bag
  • Health and safety: N95/FFP2 masks against mushroom spores and a warning about "mushroom worker's lung", which develops with repeated exposure, an extractor fan and filtered air intake, gloves against hot water, goggles when working with lime
Schedule for 15 kg of spawn
First production checklist and the start of the source list
07

MantarCi: from protocol to tracking panel

A protocol on paper only helps if it is followed in the growing room. So we built MantarCi: the grower signs up in the browser, describes the facility in a short set-up and follows production with the same steps as the protocol. The application has a public website and a panel, and it works on a phone screen too. In the application the protocol steps become a timeline for every planting: dates are calculated from the inoculation date, and the "now" step comes from the actual stage of the bags.

  • Sign-up and set-up wizard: business name and province, the species grown (button, chestnut, oyster, king oyster, shiitake, lion's mane, reishi, other) with growing method and strain for each; number of buildings, rooms, shelves and tiers, the unit on the shelf and the climate equipment in each room; opening stock; a summary at the end
  • The facility layout is built automatically from general measurements, and rooms that differ are corrected one by one. Set-up is saved as a draft at every step, so a grower who stops halfway carries on from the same step, even on another device
  • Set-up is written in a single database transaction: if something fails, nothing is left half-saved
  • Overview: today's tasks from the growing calendar, room occupancy and active plantings, this month's harvest, sales and profit, and recent actions
  • Each business sees and changes only its own data; this is enforced in the database with row-level security
  • Steps for oyster mushrooms come from the protocol: soaking the straw the day before, pasteurising and inoculating on the day, incubation checks, cold shock, pinning, harvest, rest between flushes and emptying after three flushes; for other species the durations are approximate
  • Tasks arrive as "Urgent", "Today" or "Info", each with a "How to do it?" explanation and a direct action button (for example "Move to cold shock", "Enter harvest", "Empty the bags")
  • Batch page: the step-by-step timeline, today's tasks, the materials calculation for the batch, the bag list, harvest records and action history
  • Starting a planting deducts spawn, bags and straw from stock
MantarCi overview: active bags, this month's harvest, sales and profit, and today's tasks
Batch page: today's tasks and the step-by-step timeline worked out from the inoculation date
MantarCi room page on a phone
08

Room, shelf and bag-by-bag tracking

MantarCi records production by building, room, shelf, tier and section. Every bag has a number, a place and a stage, so you can see at a glance what is on which shelf and at which stage.

  • Shelf sections: a tier can be split into sections (for example 5 shelves × 3 tiers × 4 sections × 5 bags); at inoculation the bags are placed in free spots in number order
  • Choosing the shelf at inoculation: shelves in the same room can be planted on different days; bags are placed starting from the chosen shelf, and any that do not fit move on to the next shelves
  • Shelf map: a shelf × tier × section grid showing the bag count and stage colour of each section, with the plantings and their dates next to each shelf
  • Edit room: change the number of shelves, tiers, sections and bags per section and rearrange the bags to the new layout; rooms can be added and removed
  • Every bag is tracked individually (T0001...): its place (for example R1-K2-B3), stage and day, flush and harvested kilos; filters, number search and bulk selection
  • Bag actions: change stage (incubation, cold shock, pinning, rest), move to another room or shelf, mark as contaminated, empty (worm farm, compost, chicken bedding...), enter harvest, add notes and photos
  • A contaminated bag cannot be sent to the worm farm; this rule from the protocol is also a constraint in the database
Room page: plantings, current and next step, and the shelf × tier × section map
09

Harvest, sales, stock, photos and cameras

The panel keeps the books as well as tracking production. A harvest is recorded against the bags and the batch as soon as it is entered, and mushrooms sold or lost come off the fresh stock on hand. There are two ways to follow production visually: photos taken with a phone and IP cameras installed in the rooms.

  • Harvest: spread over pinning or selected bags, with the flush count going up by one; monthly harvest, sold and waste; batch yield (kg per bag, ratio to wet substrate); fresh mushrooms on hand
  • Sales: quantity and unit price, customer, channel, payment method and credit tracking; waste records; a customer summary
  • Income and expenses: expenses by category (material purchases are added to stock), other income, monthly profit and loss and cost per kilo
  • Stock: items, stock in, stock out and counts, movement history
  • The kilos of emptied bags that go to the worm farm are totalled separately
  • Photos: take them on a phone and upload them linked to a room, batch or bag, with a gallery; photos are resized in the browser and kept in private storage
  • Cameras: an IP camera is installed in each room, and a small computer on site (Raspberry Pi) takes a frame at a set interval and sends it to the system
  • The panel shows camera status and the latest frame, the device key and a ready-made configuration file; the room page shows the latest image
  • Time-lapse: frames taken from inoculation to harvest are played back one after another
  • Camera passwords never go to the cloud; they stay on the on-site computer
10

Growers' community

Growers who use MantarCi can choose to join a community. Members see each other's production stages and who will harvest when, and can request mushrooms from one another.

  • Joining is voluntary: display name, province and district, contact details and a short description; members can leave at any time
  • Harvest calendar: who will harvest when over the next 45 days and roughly how many kilos, worked out from the inoculation date and the stage of the bags, filtered by species and province
  • Grower cards and "View production": active plantings and how many bags are at each stage, and optionally the fresh mushrooms on hand
  • Request flow: a request with product, species, quantity, wanted date, delivery method and offered price; the grower accepts or declines, marks it complete on delivery and can record it in sales; a message thread under every request
  • Income, expenses, sales amounts, customers, stock, photos and camera images are never shared; other businesses' data is reachable only through this limited summary
Community: the growers' estimated harvest calendar for the next 45 days
11

What we did specifically for this operation

This work is not a general "how to grow mushrooms" article. Every figure and every recommendation was worked out for this operation's materials, room and workforce.

  • All quantities were calculated for Mushroom Store A of about 30 m² at the Giresun Organic Integrated Farming System and the 15 kg of ALFA MİSEL HK-35 on hand; the 7 batches, 37 bags and 120 kg of straw were worked backwards from this stock
  • Because there is no boiler or steam room and the grower does the work himself, the hot water drum method was chosen; the equipment list was written with easy-to-find items such as a wood stove, a meat thermometer and onion sacks
  • Fit with the farm's cycle: chicken manure goes to the worm farm and the hazelnut orchard, spent substrate to the worm farm and as poultry litter; a note that the heater is temporary until the heat from the poultry house is connected
  • A note for the Giresun climate: the basement will be 14-16 °C in October and incubation needs a heater
  • An assessment specific to this farm of the existing spawn blocks that had been kept warm, with a trial bag plan
  • A risk-reducing order: first a 5-bag trial batch, then the remaining 13 kg of spawn if the result is clean; new spawn if the trial is contaminated
  • Sales preparation: commitments from 3-5 local buyers before the first production, and same-day delivery
12

Who it is for

The protocol was prepared for the conditions of one farm, but it is also useful for growers who want to start oyster mushroom production on a small scale without special equipment. The documents use plain language and speak directly to the person doing the work.

  • Growers who want to start with a drum and a thermometer, without a boiler or steam room
  • Those who want to start small and scale up once the method works: the documents suggest a first batch of 5 to 10 bags
  • Those who want to see where each decision comes from: the key figures name the institution behind them
  • Growers who plant several rooms and shelves on different days and want to follow their bags, harvest and sales in one panel
  • Anyone looking for a team that can research and compile information and turn it into a practical guide for their own business

Planning a similar project?

Tell us what you need; we will define the scope, timeline and cost together. The first consultation is free.

Tell us about your project